

Intro
Karpenter, the Kubernetes nodes auto-scaler solution developed by AWS, was the open-source tool the DevOps eco-system was waiting for to scale and optimize K8s clusters on AWS.
Karpenter provides DevOps teams with these valuable capabilities out of the box, and up until recently were available only by using costly 3rd party vendors:
- Optimal Resources Utilization
- Significant Cost Savings
- Advanced Scheduling
Karpenter utilizes Kubernetes CRDs to create, configure, and manage EC2 instances in a Kubernetes cluster, and it auto-scales K8s nodes based on pod resource requests according to real-time application demand. (e.g. CPU, memory, etc.).
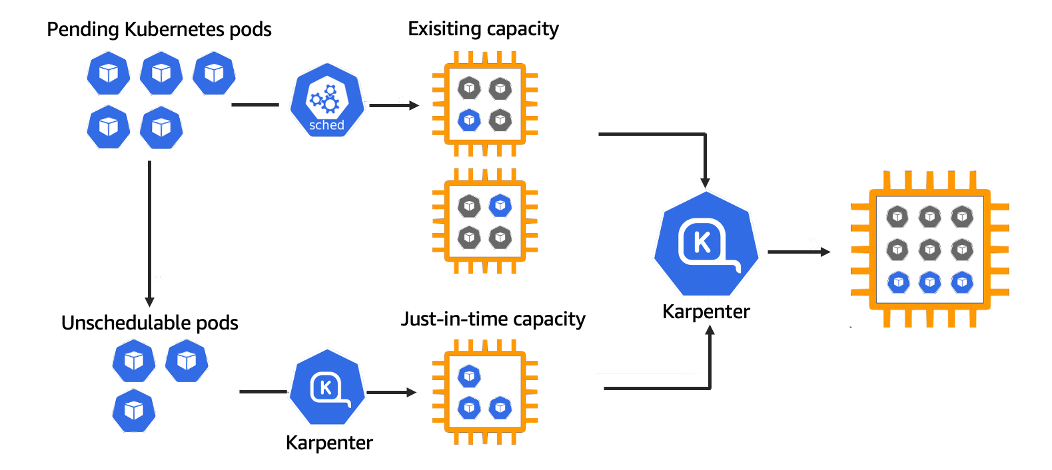
Karpenter is mostly used by organizations looking to reduce the EC2 costs of their EKS clusters by provisioning Spot Instances and consolidating pods on nodes, but don’t want to pay a 3rd party vendor for leveraging these capabilities.
Over the past few years, Directeam has had the opportunity to implement Karpenter on our customers’ Kubernetes environments and gathered some valuable insights and hacks along the way.
I am taking into consideration that you are already pretty familiar with Karpenter so I won’t be covering the Karpenter basics.
If you are just getting started with Karpenter, I recommend reading this article first.
In this blog post, we will dive deep into the untold practices of Karpenter and provide you with some insider tips and insights we logged from the trenches to help you make the most out of your clusters.
You won’t find these use cases anywhere else so I suggest you strap in, we’re going on a ride.
When should you use Karpenter?
Karpenter was built for flexibility and agility and can fit almost any requirement or use case.
The main considerations for using Karpenter to scale and optimize EKS clusters:
- Easily utilize spot instances for cost savings – up to 90% savings off the On-demand price.
- Consolidation of nodes to reduce unallocated compute resources.
- Supports varying workload types with separation – for example, Karpenter can support additional GPU workloads, but can also prevent non-GPU workloads from starting on GPU nodes.
- It’s GitOps compatible.
- Node startup can take between 1-2 minutes – currently, there is no over-provisioning support.
Karpenter is the ideal solution if you are looking to scale and optimize your K8s workloads on AWS.
However, if scaling within seconds is critical for your application, then choosing Karpenter may pose a performance risk so always validate the compatibility of your workload.
Get the most out of Karpenter
After implementing Karpenter for dozens of Directeam’s customers, we gathered the following best and untold practices we recommend to implement as part of your configuration.
Use VPC CNI prefix delegation feature
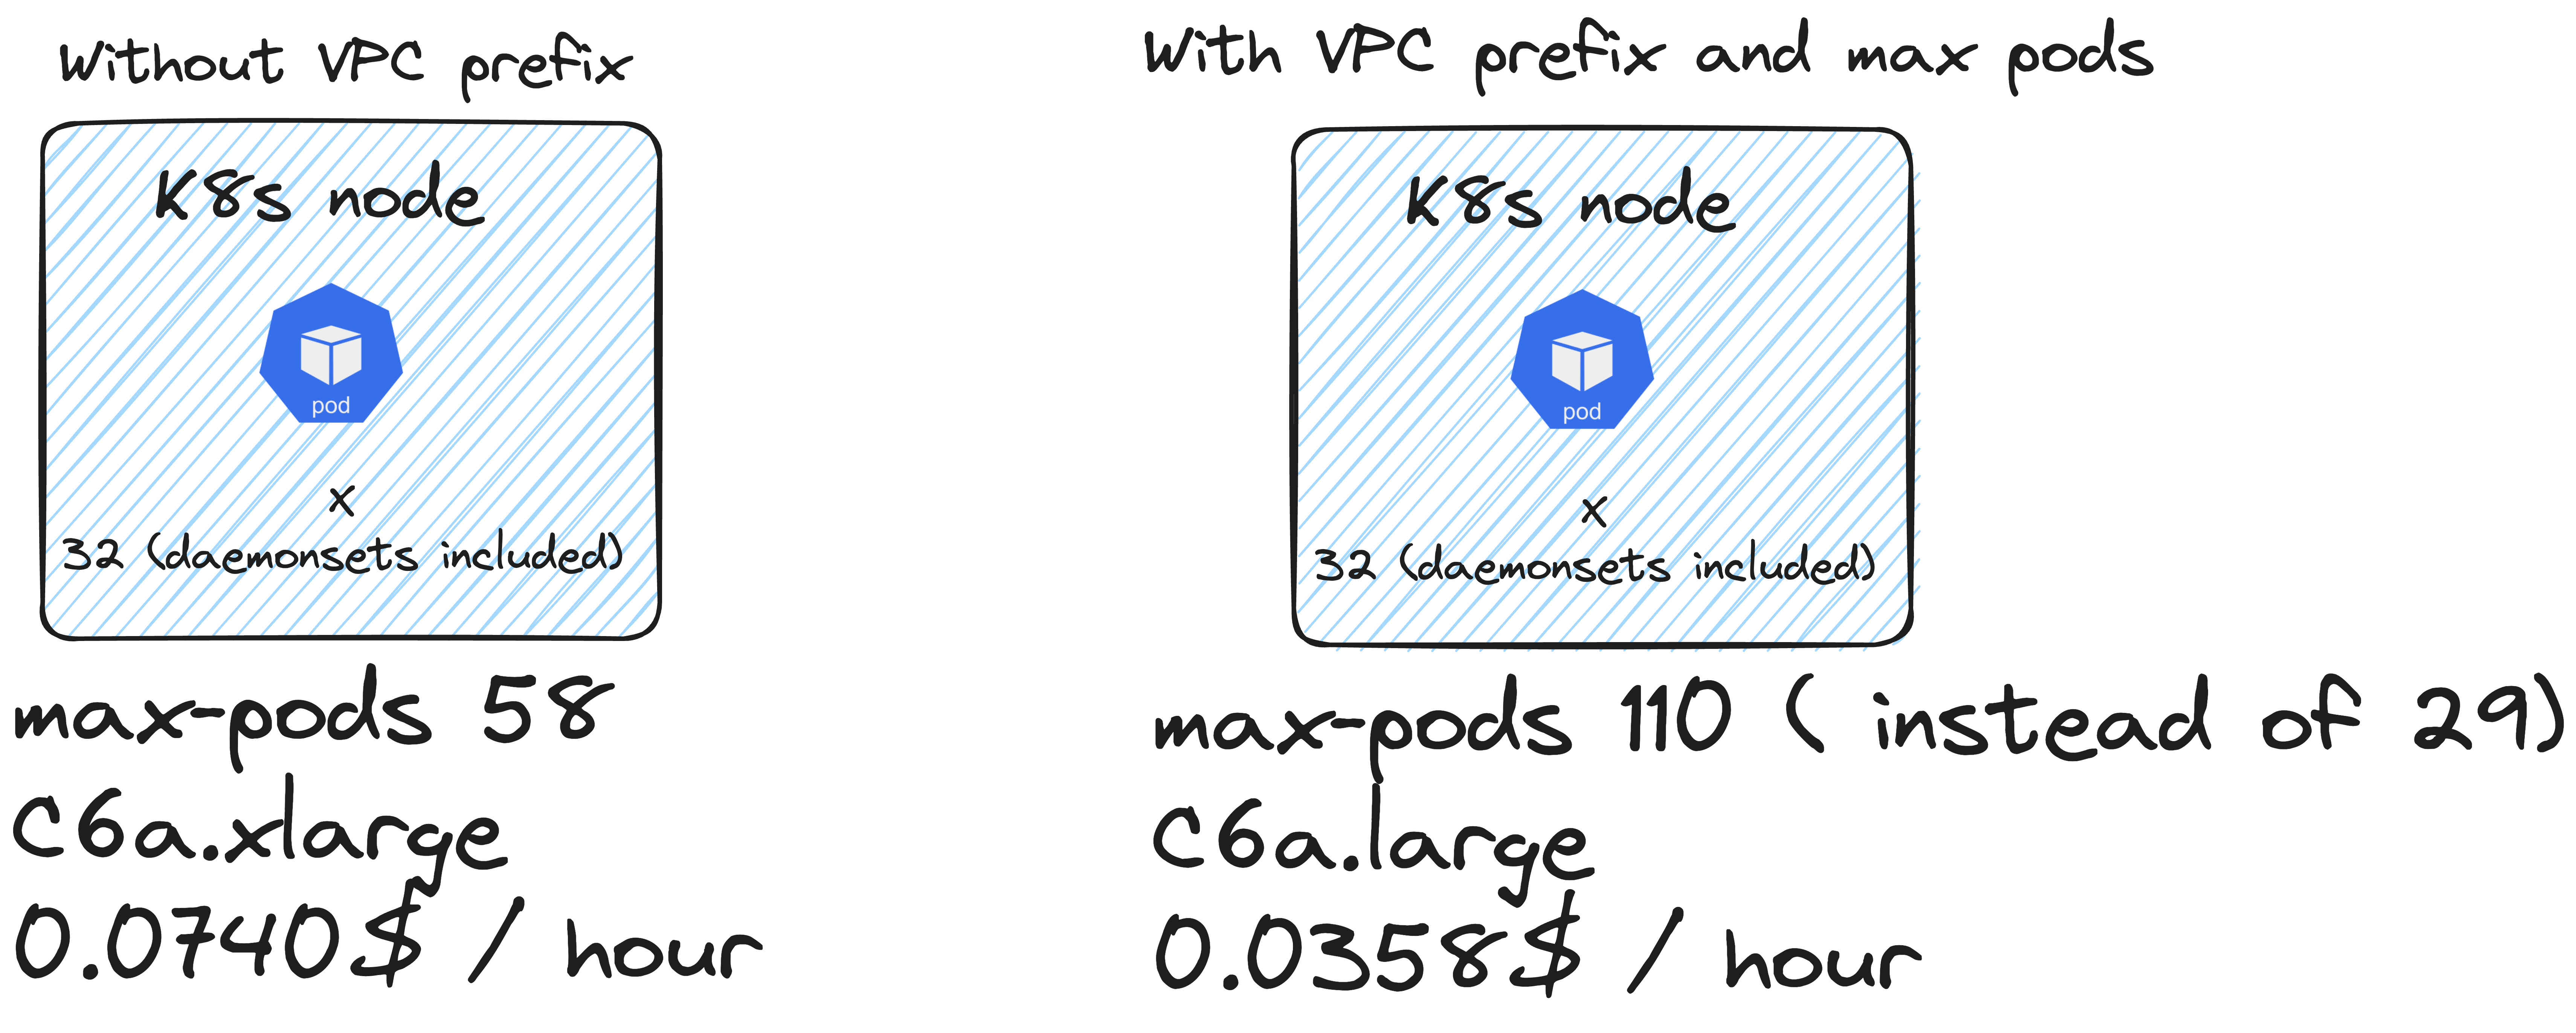
Each EC2 instance type has a limited number of IPs that can be allocated to it.
Each Kubernetes pod receives an IP, so each node can contain pods per the number of IPs allocatable to the instance type. In smaller instance types this may not be enough to run our workload, especially when taking into consideration DeamonSets.
Moreover, it might prevent us from fully utilizing the node’s resources, thus having nodes with plenty of headroom but with no option to launch pods on them.
To overcome this challenge, we can use the VPC CNI add-on with a prefix delegation feature. This feature allocates a /28 CIDR block instead of a/32 CIDR that can only attach one IP, which significantly increases the number of pods that can be launched on each node.
Here are a few tips to take into consideration when using this feature:
- Make sure you have a CIDR block that is long enough to support this in your subnets, depending on your workload. The more pods you’re going to run, the more available IPs you are going to need, including DeamonSets. The best practice is to Opt for subnets that are /22 or larger.
- This feature will only work on Nitro-based Hypervisor instances, you can configure Karpenter’s node pool to launch all the instances in the cluster in that configuration.
- If you choose not to use this feature, make sure your node pool is configured with instances with enough allocatable IPs (usually larger instance types). This GitHub repository contains a full list of instance types and how many pods can run on each, for your reference.
Consolidation
Consolidation is the process of optimizing the nodes to our desired workload to reduce pricing and over-provisioned resources. Since Karpenter uses resource requests to manage the nodes, it will also consolidate based on that. When there are available resources it will re-schedule nodes, and create new nodes based on these requests.
There are several types of consolidation:
- Deletion consolidation – If a node is empty, Karpenter will delete it from the cluster. If all the pods running on a specific node can be moved to different existing nodes, it will move them and then delete the node.
- Replacement consolidation – Replacing larger nodes for smaller nodes, or several small nodes for one larger node.
For Spot instances, Karpenter currently supports by default only deletion consolidation.

NodePool Breakdown
The NodePool resource contains the configuration that lets Karpenter know which instances can be provisioned.
This resource will be created based on your needs, and you can create several NodePools for different workload types.
For example, if you have instances that are sensitive to interruptions and require data continuity like batch jobs and databases, we recommend configuring a NodePool for these workloads with on-demand instances and another Nodepool with less restricted consolidations for less sensitive workloads.
Let’s dive into the NodePool requirements configuration.
Instance Types
The first thing to take into consideration is the instance type – is your workload CPU-intensive? Maybe it needs to run on a GPU? This is where you can tell Karpenter which instance types fit your workload.
However, there are instance types that are not recommended for Kubernetes workloads such as T burstable instance types.
Why is that?
T Burstable instance types can only reach full utilization as long as you have credits. Once you run out of credits, they can’t reach their full potential.
For Kubernetes workloads that schedule pods based on the amount of CPU an instance has, it means that once you use all credits, your application can be throttled.
What about Flex instance types?
Amazon recently introduced Flex instances. In theory, they’re very similar to T instance types – you get better pricing but may be unable to utilize all of the CPU.
However, in practice, Flex instances can scale up to the maximum CPU 95% of the time and don’t use the credit mechanism. So they are more reliable to use in Kubernetes to save costs.
Instance Hypervisor
Earlier we discussed the importance of using the Prefix Delegation VPC CNI feature.
Nitro hypervisor instances are a requirement for the Prefix Delegation feature.
- Most of the instance types in the more recent generation are based on a Nitro-based Hypervisor, so there is no concern that it limits our Nodepool.
Capacity Type
The possible values are On-demand and Spot instances.
Spot instances are preferred to reduce costs, however, their availability is not guaranteed, as it is AWS excess capacity that can be taken within a 2-minute notice.
So to support high availability with a fallback mechanism in cases where there aren’t any Spot instances available, we configure both Spot and On-demand.
By design, Karpenter will always try to provision the most cost-effective option, so if we have both Spot and On-demand configured as our nodes, Karpenter will always try to provision Spot instances before falling back to On-demand.
However, what if there aren’t any Spot instances available?
Karpenter will fall back to On-demand but only if we configure the capacity types as On-demand as well as Spot.
This is a critical step to ensure we have HA (High-availability) in case of no available Spots and is especially important if our pool is limited in other aspects like the instance types available.
Disruption and Budgets
Another important section in the NodePool configuration is disruption.
Disruption is the area responsible for the consolidation configuration.
You can choose to allow Karpenter to consolidate your nodes when they are underutilized or to allow Karpenter to consolidate only empty nodes if you want to avoid interruptions.
consolidationPolicy: WhenUnderutilized | WhenEmpty
Another configuration option in this section is “budgets”.
Disruption budgets are the configurations that tell Karpenter the percentage of my workload that can be disrupted simultaneously and use a cron expression to allow consolidation at specific times. We can use these percentages and cron values combined to create several budgets for different times of the day/week, depending on real-time application demand.
budgets:
- nodes: "20%"
- nodes: "5"
- nodes: "0"
  schedule: "@daily"
  duration: 10m
This is a terrific feature that provides you with more control over interruptions at specific times of the day. For example, if your application demands more compute resources during noontime.
This is also very useful when you want to maximize consolidation in development environments during non-work hours to reduce your costs.
Max Pods
This is an optional field that can be used to set the maximum amount of pods on each node.
By default, Karpenter sets this value based on the allocatable IPs per instance type.
When enabling the VPC CNI Prefix Delegation feature, we recommend setting this value to 110, as per the official recommendation for Kubernetes.
This will allow Karpenter to maximize your nodes’ consolidation, and fully utilize the nodes’ resources.
To prevent a single point of failure due to all deployments’ replicas being provisioned on a single node, we recommend implementing these set of rules:
- Pod affinity rule
- Pod disruption budgets (PDBs)
Limits
Setting limits on NodePool resources is mainly useful for development environments where significant costs can be saved by capping the resources.
With limits configuration, you can limit each NodePool to a specific amount of requests – CPU, memory, storage.
This will prevent Karpenter from creating too many resources if there are any configuration issues with the resource requests or autoscaling.
NodePool example
Let’s sum up all the practices we just reviewed and create an example NodePool out of it.
apiVersion: karpenter.sh/v1beta1
kind: NodePool
metadata:
  name: default
spec:
  weight: 100
  limits:
    cpu: "4"
    memory: "16Gi"
  template:
    spec:
      nodeClassRef:
        name: default
      requirements:
        - key: "karpenter.k8s.aws/instance-category"
          operator: In
          values: ["c", "m", "r"]
        - key: "karpenter.sh/capacity-type"
          operator: In
          values: ["spot","on-demand"]
        - key: "karpenter.k8s.aws/instance-hypervisor"
          operator: In
          values: ["nitro"]
      kubelet:
        maxPods: 110
  disruption:
    consolidationPolicy: WhenUnderutilized
    budgets:
    - nodes: "20%"
    - nodes: "0"
      schedule: "0 12 * * *"
      duration: 2h
Additional NodePools
When you have workloads that have different requirements, a NodePool will be configured for each set of requirements. For example, in addition to the NodePool from the example, we might need to set up a GPU NodePool, or an On-demand one.
If a pod’s requirements fit more than one NodePool, Karpenter will start with the one with more weight and continue to the next one until the requirement is fulfilled and the pod is scheduled.
Since our “default” NodePool contains the Consolidation type of WhenUnderutilized, it might not fit every service since the consolidation causes interruptions.
The best way to configure workloads across different NodePools is to use a nodeSelector based on the name of the NodePool.
Interruption Handling
Enabling interruption handling when leveraging Spot instances is crucial.
Before a Spot instance is terminated, AWS provides a short 2-minute notice.
For Karpenter to be aware of interruptions, we need to enable interruption handling.
When enabled and a notice is received, Karpenter cordones the node giving the workload 2 minutes to terminate gracefully and for a new node to start and become ready for the pods.
To enable this feature you can follow Karpenter docs – https://karpenter.sh/docs/concepts/disruption/#interruption
Conclusion
In this blog we discussed concepts that can help you get the most benefit out of Karpenter, like using the VPC CNI prefix delegation feature with max pods, setting up Consolidation, disruption budgets, and choosing the right pool configuration based on environment needs.
By implementing these practices, you can harness Karpenter to its full potential for maximum capacity utilization of each node’s resources to reduce infrastructure costs, and adjust Karpenter’s NodePools for each one of your needs.
When adopting these practices with our customers we observed up to 50% cost reduction in computing resources and saved costs on 3rd party Kubernetes auto-scaling solution fees by using open-source.
With that in mind, if you’re an AWS customer running EKS workloads, Karpenter is a no-brainer!