


What have we learned so far?
So far we mostly explained things you probably know in one way or another, we explained concepts like allocatable and Quality of Service (QoS) in the first part and CPU requests and shares in the second part.
In this part, we will focus on what is actually happening when you set CPU limits.
TLDR; don’t set CPU limits!
We highly recommend you read the previous parts of this blog to get a solid understanding of what we’re about to explain. Once you’ve read it, if you did the math correctly, you probably start to understand that CPU limits are not the way to achieve a fair division of CPU time between containers.
CPU time is divided among the containers by their CPU shares (or requests).
The CPU Limits myth
As we’ve said, when getting into Kubernetes we are advised to set CPU limits to make sure we aren’t being ‘noisy neighbors’, meaning that if our workloads start to be CPU hungry it won’t eat up all of the CPU that our other workloads needs. But we’re afraid this is a complete myth since as we’ve explained in part 2 – if you configure CPU requests you are guaranteed to receive at least this amount of CPU from the CFS.
What about overloading the node?
CPU is a compressible resource, and this is why there is no eviction for CPU stress, only throttling (delay).
What do CPU limits actually do?
As we’ve explained in the first part, Kubernetes will throttle the CPU usage of containers that reach their CPU limit.
This is done by configuring the following CGroup parameters:
- “cpu.cfs_period_us” – This configures what a “CPU period” is in microseconds, or if we are using the same example as in part 2, the time interval for every new CPU pizza. (Currently, Kubernetes configures this to be 100,000µs [100ms] by default, this can be configured via the kubelet configuration)
- “cpu.cfs_quota_us” – The CPU time in µs that the container (CGroup) can consume every period. Every 1 vCore you define as CPU limits will configure 100,000µs (100 ms) quota – equal to the period.
You can learn more about the above CGroups configurations here.
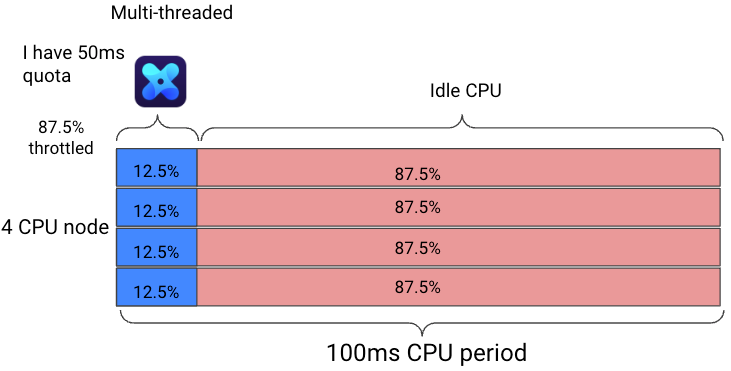
So for example, if you have configured 0.5 vCore as CPU limit (500 milli-cores) 50,000 µs (50ms) will be configured as the quota giving the CGroup a maximum usage of 50ms per the 100ms period. If the processes in the container (CGroup) asks for more, they will have to wait for the next CPU period, meaning waiting the remanding 50ms of the period, this is CPU throttling. This is also only true if my process runs on one core (one thread can only use one core).

Sounds simple? Let’s make it a little more complicated with multi-process containers / multi-threaded processes!
Every core you use consumes time out of the quota simultaneously.
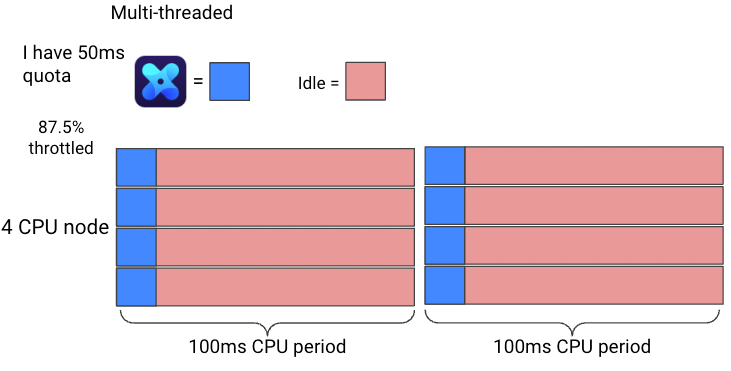
For multi-threaded (like Java thread-pool) or multi-process tasks, if you run on 4 cores simultaneously, you will consume your quota in 12.5 ms (4 milliseconds of the quota for every actually millisecond) and will be throttled for the rest of the period – 87.5ms!
The more cores your node has & your container utilizes, the worse the throttling will get, so if we take the same example and run it on a node with 8 cores it will consume its quota in only 6.25 milliseconds!
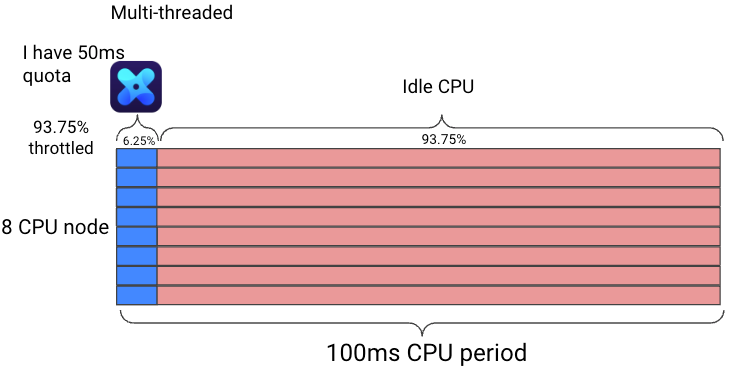
We would show an example on a node with 88 cores, but I’m sure you get the point. Throttling hurts your container’s response times drastically!
CPU Limits in real life
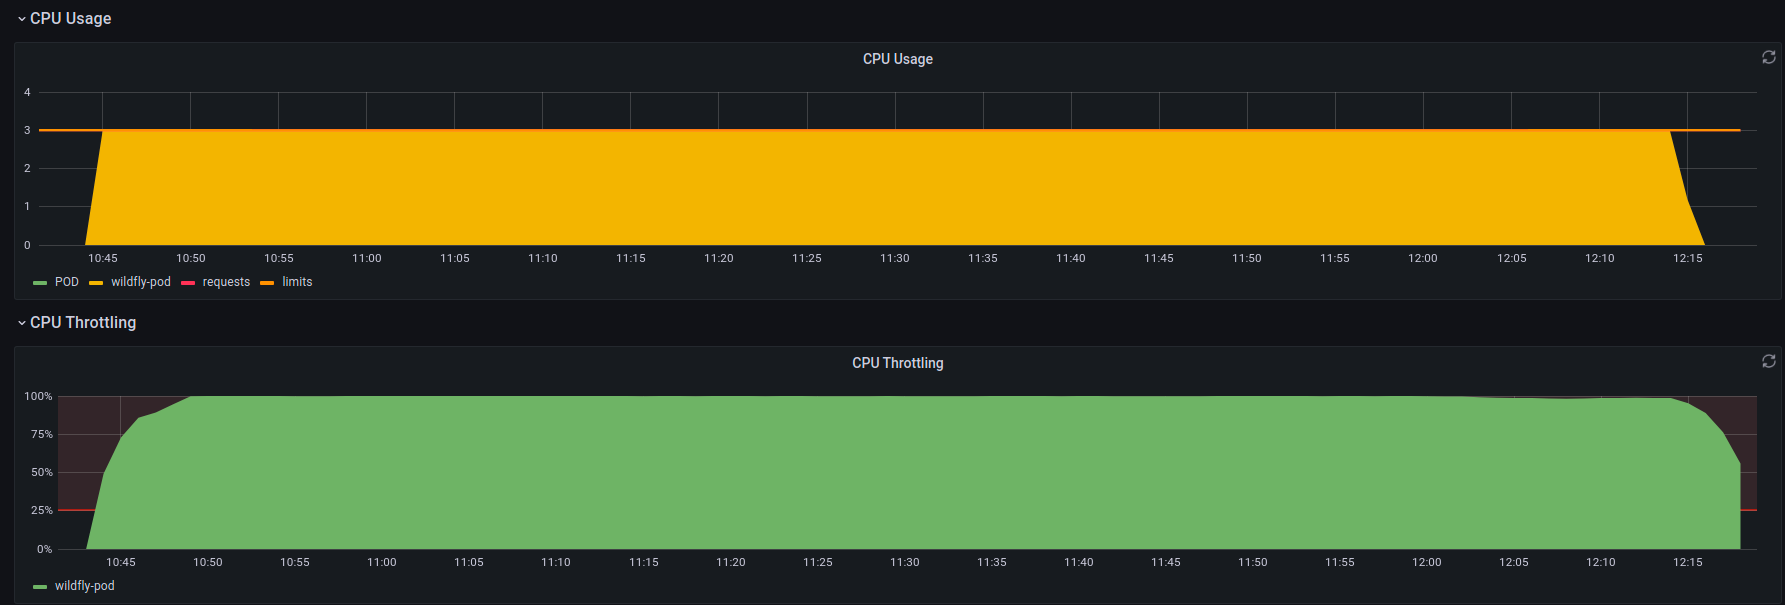
Here we can see the CPU usage of a CPU stress test that is single threaded (therefore can only use up to 1 core) with 3 cores as CPU limit.
As expected we aren’t getting throttled by the CPU limit and the process is getting all of the CPU it needs (or in our stress test case, all the CPU it can get!).
Bonus myth: Another best practice misunderstanding is to set your CPU request or limit at 1 vCore or below. This is only true for containers that are single-threaded, and yes, it’s better to use multiple containers or pods for parallel jobs than to replicate processes for the same task in the same container, but languages such as Java and GoLang are highly concurrent by design, so when utilizing multiple threads with concurrency, you absolutely need to set more than 1 vCore as your CPU request if your app requires it.
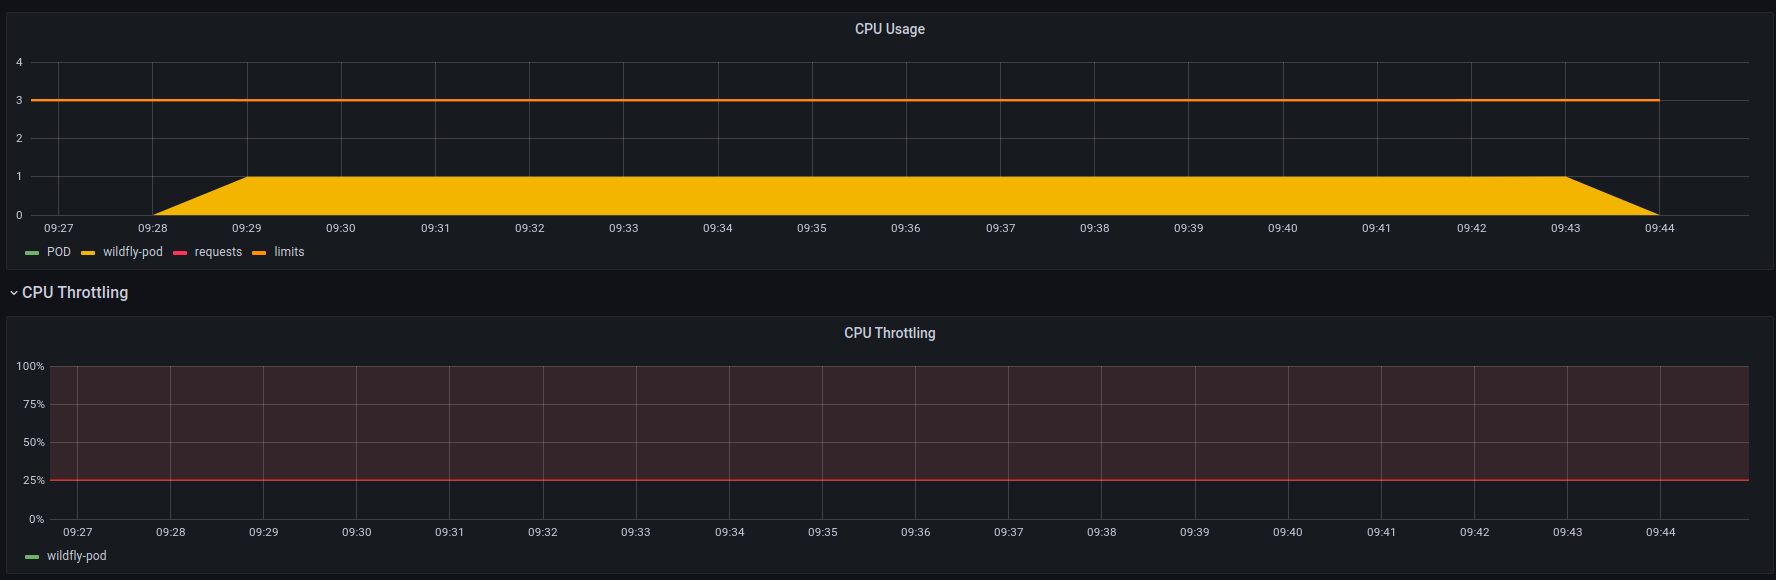
Here is an example of a multi-threaded CPU stress that also has 3 vCPU limits and as you can see, it uses all of its available CPU and is suffering from a huge amount of throttling.
*there is more than one perspective for measuring CPU throttling, We will elaborate in a future blog.
Note that we didn’t show you the total CPU usage of the node, and in our stress pod example, there isn’t any other CPU-intensive activity on the node. But the stress pod is throttled regardless of this fact due to the CPU limit, causing idle CPU to be wasted.
We have already explained why the node’s CPU stress is not really a problem, the stressed pod has X CPU shares, and in case other pods will require CPU (that are in their requests), they will get it, and the stressed pod will just gain less idle CPU, being throttled down to its requests.
The CPU Limit anti-pattern
Let’s see it in action! I have a cluster with one worker node that has 2 vCPUs.
First, I started 2 pods running a full CPU stress. Both of them have no CPU request or limit, falling into the Best effort QoS class.
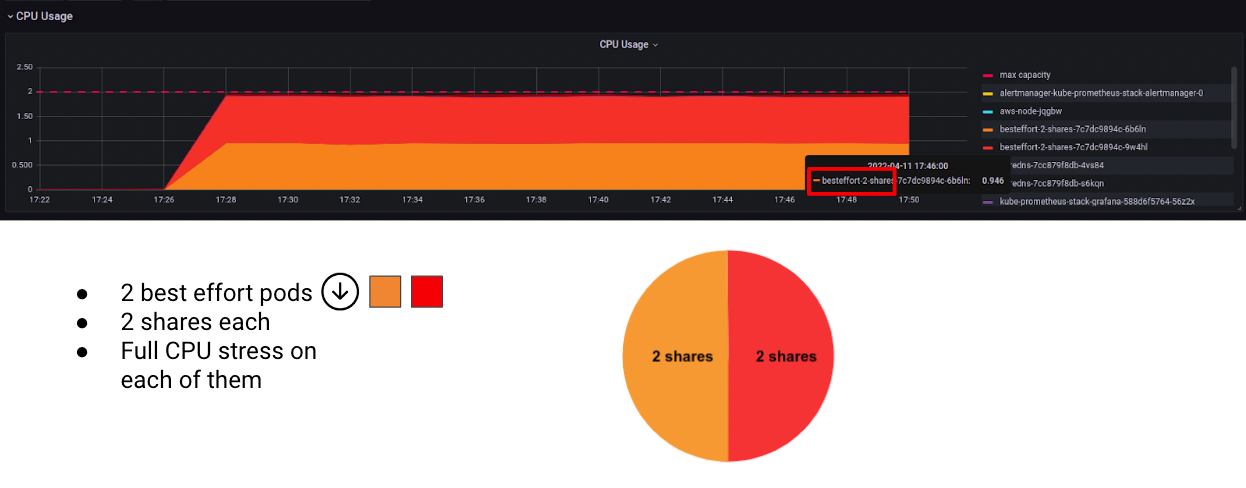
Containers with no CPU Requests will receive 2 CPU shares by default.
Since there are 2 containers running on the node with the same amount of CPU shares, that want as much CPU as possible, the CFS will split the CPU time between them.
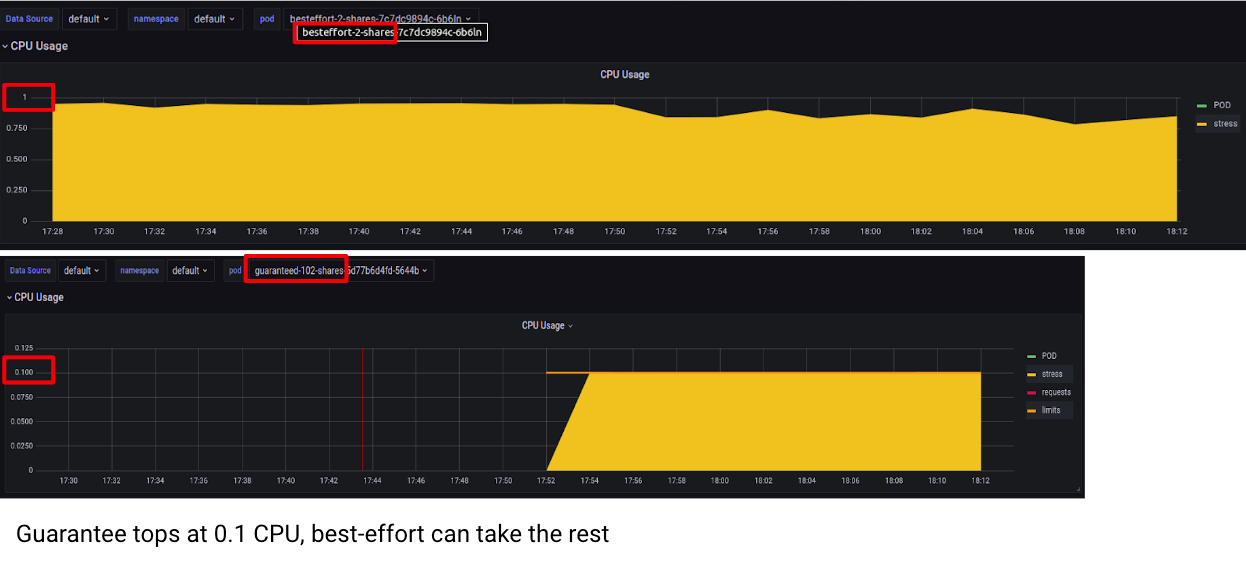
Now, Let’s start another 2 pods, this time guaranteed QoS class pods with 0.1 CPU request and limit.
0.1 CPU requests is 100m CPU, which equals to 102 CPU shares. Do you think a “higher” QoS pod with 50 times the CPU shares will get more CPU than the BestEffort pods? Hopefully by now you understand that the CPU limit in-fact prevents this from happening.
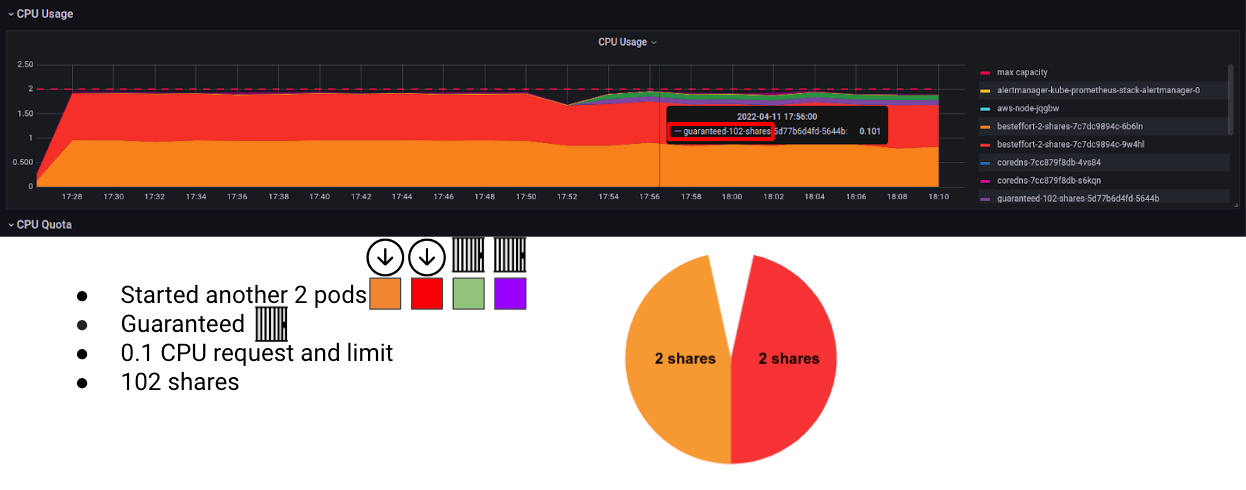
And voilà! The Guaranteed pods get up to the CPU Limits and never more, no matter if there is idle CPU on the node or not.
Here is a closer look at the CPU allocation for those pods.
Notice the small drop in CPU usage? This is from the deployment of the Guaranteed pods, but not because of their QoS class, only due to the fact that they have more CPU shares!
The final step in this experiment is to start another set of 2 pods, this time with the same 0.1 CPU Requests but with no limit. Burstable QoS.
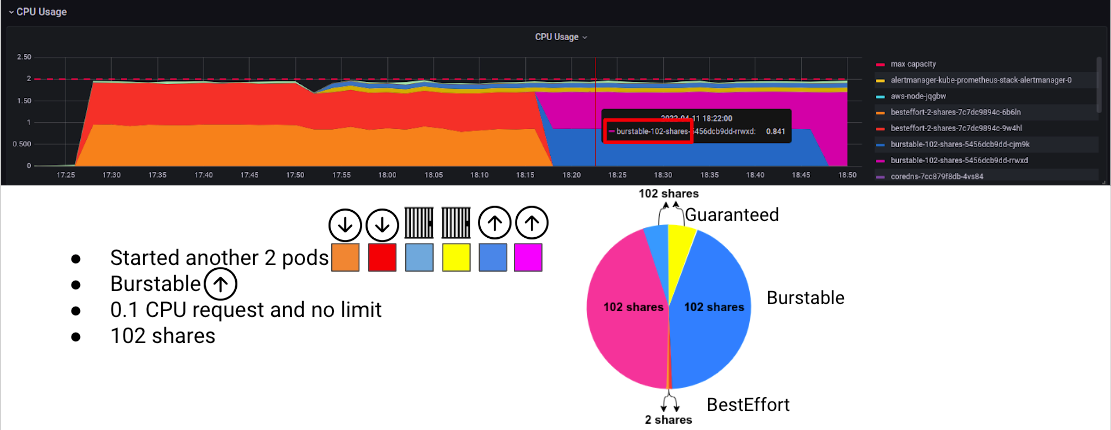
Notice what happened to the BestEffort pods? No, I didn’t delete them, they just got run down almost completely, to the point you can’t even see them in the graph!
This is because the new Burstable pods have much more CPU shares. The Guaranteed pods are ‘guaranteed’ (See what I did there) to get the same amount of CPU no matter what, they are not guaranteed to be top priority pods on the cluster.
Note that during this time, the node stays consistently on 100% CPU and didn’t crash, not only did it not crash, all of the components on the node like Kubelet, CoreDNS, Kube-Proxy and the others kept working just fine. The hungry pods fought only for the CPU leftovers.
The bottom line. CPU limits are only for preventing the use of CPU leftovers, not to prevent noisy neighbors or to protect your nodes from overallocation. Mic dropped.
So go ahead and remove your CPU limits!
When to use CPU limits?
But wait, why do CPU limits exist in the first place?
You may have heard that Google uses CPU limits in their workloads, and assumed that It must be the best practice. Well, it depends on what you’re trying to achieve, Google prefers consistent workloads over performant workloads. It makes much more sense for organizations with many groups that consume resources from one central cluster (or cluster operators). They must have a reproducible performance every single time at the group level, before thinking about performance at the organization (or cluster) level.
Are you Google? Probably not. Most of us are trying to achieve the best possible performance on the cheapest infrastructure while minimizing downtime. Production workload should be able to utilize idle CPU. Containers won’t “steal” CPU from other containers if you set your CPU requests right, if you didn’t set CPU requests or set them badly, I’m afraid that the CPU limit wouldn’t save you.
Similar to Google’s use case, GKE AutoPilot is another great example.
GKE AutoPilot in a nutshell is a managed Kubernetes cluster, that not only manages the control plane for you but also the nodes, you just need to apply your pods.
AutoPilot will always set CPU requests and limits for you (unlike AWS Fargate), even if you didn’t define it in your pod spec. That will guarantee consistent performance over and over again. You can’t enjoy idle resources but you can be sure that you will always get the same performance no matter what node you’re running on.
Real-life use-cases
In our day-to-day, we may want to set CPU limits on staging environments to simulate “the worst case scenario (no idle resources to consume)” and to be able to run stress tests without using the idle CPU that can’t and shouldn’t be counted on.
In production, there is not a good usage for CPU limit, even for low-priority containers. If your goal is to reserve the idle CPU capacity for your important workloads, just adjust the CPU Requests accordingly.
CPU resources best practice
After months of diving into the Kubernetes resources rabbit hole, the conclusions We’ve come to are:
- Set your CPU Requests as the relative weight you want the container to have. No less than the expected CPU usage.
- Concurrency matters, you can’t run on more cores than your task knows how to utilize, so don’t set CPU requests higher than 1*(number of concurrent threads/processes) you have.
- Never set CPU limits if performance is what you desire.
This is what Tim Hockin, one of the first creators & maintainers of Kubernetes at Google advised in a tweet a few years back;
This is why I always advise:
1) Always set memory limit == request
2) Never set CPU limit(for locally adjusted values of "always" and "never")
— Tim Hockin (thockin.yaml) (@thockin) May 30, 2019
Wait, memory request should be equal to the memory limit? We’ll dive into this in the fourth & final part of this blog. stay tuned!